
Blog
10 Ceiling Noise Reduction Tips for a Quieter Room
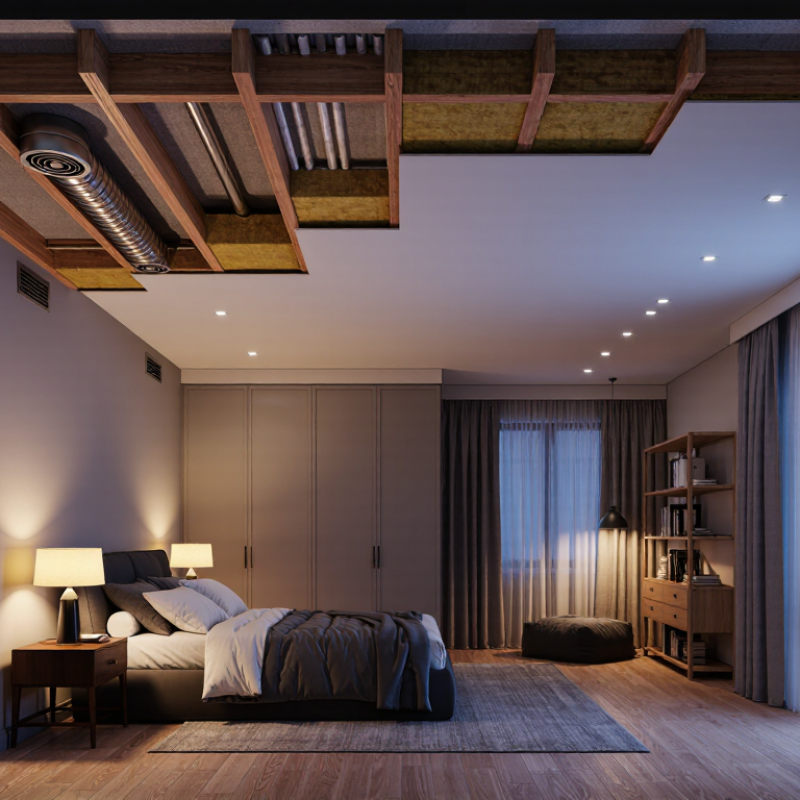
A footstep overhead can turn a quiet evening into a series of sharp thuds. A humming fan may seem minor, until it follows you into sleep. Effective ceiling noise reduction starts by identifying the sound path: airborne voices, impact noise, or vibration traveling through framing. The distinction matters. A soft ceiling finish may absorb echoes but do little to stop noise crossing a floor assembly.
The World Health Organization’s Guidelines for Community Noise recommend keeping continuous indoor bedroom noise below 30 dB(A) for good sleep. That benchmark describes room noise, not a guaranteed ceiling rating. ASTM E90 laboratory testing measures sound transmission through building partitions, while real-world results can vary with gaps, ducts, recessed lights, and construction details. Small openings matter.
Acoustics professor Lily M. Wang’s research in architectural acoustics supports a broader view: manage the room, materials, and sound paths together. A practical paraphrase—not a verbatim quotation—is: “Treat the whole assembly, not just the visible ceiling.” That idea frames these 10 ceiling noise reduction tips, from sealing penetrations and adding insulation to considering resilient channels or a suspended ceiling. The right fix depends on the source, the existing structure, and the room below. Some projects need professional assessment; others begin with a careful inspection and realistic expectations. Noise control is rarely magic. And one extra layer alone may disappoint.
Identify the Type and Source of Ceiling Noise
Ceiling noise becomes easier to trace when you note its character, timing, and location. Muffled voices or television usually point to airborne sound passing through gaps or a thin ceiling. Heavy footsteps and dropped objects create impact noise, often felt as a thud as well as heard. A steady hum, rattle, or periodic click may come from a fan, duct, pipe, or other building equipment. Listen before touching. Does it happen only when heating or ventilation runs, or when someone walks overhead?
The World Health Organization’s Guidelines for Community Noise (1999) recommend bedroom indoor levels below 30 dB LAeq and single-event peaks below 45 dB LAmax for good sleep. These are health-oriented targets, not a test for where sound enters your room. A phone sound-meter app can help compare loud and quiet moments, but it is not a calibrated measurement. That distinction matters. I’ve found that a brief sound log can reveal patterns that a quick inspection misses, though timing alone may not prove the cause.
Tip: Write down the time, sound type, and room location for several days. If safe, compare the noise with ventilation switched on and off using its normal controls. Ask someone upstairs to walk across the floor while you listen below. A sharp change near one ceiling corner may suggest a local path; a low, even hum may travel through framing. Don’t assume the loudest spot is the source.
10 Ceiling Noise Reduction Tips for a Quieter Room - Identify the Type and Source of Ceiling Noise
| Tip | Noise Type or Likely Source | Clues to Check | Practical Action | Important Consideration |
|---|---|---|---|---|
| 1 | Voices, television, or music from above | Speech or music is audible, especially when the room above is occupied. | Seal gaps around ceiling fixtures and perimeter joints with suitable acoustic sealant. For a major improvement, consider adding ceiling mass and resiliently separating the new ceiling from the structure. | Soundproofing usually requires a combination of airtightness, mass, and separation. Decorative foam alone is not an effective barrier to sound passing through a ceiling. |
| 2 | Footsteps or dropped objects | Dull thuds or sharp impacts occur when someone walks or moves objects on the floor above. | Where possible, use a thick rug or carpet with an underlay in the room above. A professionally designed resilient ceiling system may also reduce transmitted impact noise. | Impact noise travels through the building structure, so treating only the air inside the lower room may have limited effect. |
| 3 | Water pipes or plumbing | Knocking, ticking, or rushing sounds coincide with a tap, toilet, shower, or heating cycle. | Identify the fixture and timing first. Have loose pipes secured and, where appropriate, isolated from framing with suitable pipe supports or cushioning. | Do not open a ceiling near active water leaks or electrical wiring. Persistent pipe noise may require a qualified plumber. |
| 4 | Heating or cooling equipment | A low hum, rattle, or vibration starts and stops with the heating, cooling, or ventilation system. | Check accessible filters and grilles for looseness or obstruction. Arrange inspection of noisy equipment, mounts, and duct connections. | Switch off equipment before inspecting accessible parts, and leave electrical or mechanical repairs to a qualified professional. |
| 5 | Vibrating ducts or ceiling grilles | Buzzing or rattling is strongest near a vent and may change when airflow changes. | Check that the grille is firmly seated. A technician can inspect duct supports and add suitable vibration isolation where needed. | Do not block or cover supply or return vents; restricting airflow can affect system performance. |
| 6 | Rain or hail on the roof | Noise occurs during precipitation and is often strongest in rooms directly beneath the roof. | Inspect the roof assembly and attic insulation for gaps or damage. Improving insulation and adding an appropriate ceiling assembly may help reduce sound transmission. | Roofing and insulation work should account for ventilation, moisture control, and local building requirements. |
| 7 | Wind entering gaps or moving loose components | Whistling, fluttering, or intermittent rattling occurs during windy weather. | Check accessible attic openings, roof details, and loose ceiling fixtures. Have air leaks or loose exterior components repaired and sealed appropriately. | Do not seal required attic ventilation openings. A roofing professional can distinguish unwanted drafts from necessary ventilation. |
| 8 | Crackling or popping from building materials | Occasional clicks or pops occur as the building warms, cools, or changes humidity. | Note when the sounds occur and whether they are localized. If they are frequent or accompanied by visible damage, arrange an inspection of the ceiling and framing. | Some expansion and contraction sounds can be normal, but new or worsening sounds should not be assumed harmless. |
| 9 | Animals or pests in a ceiling void | Scratching, scurrying, or repeated movement is heard, often at night or near the attic. | Look for signs from a safe, accessible area and contact a qualified pest-control or wildlife professional to identify and remove the cause. | Do not seal an entry point until you know the animal is no longer inside. Avoid handling droppings or disturbing nesting material. |
| 10 | Noise with no obvious source | The sound is intermittent, changes with time, or seems to come from different parts of the ceiling. | Keep a short log of the time, sound type, weather, and nearby activities. Compare the noise with plumbing, HVAC, and activity in rooms above. | Accurate source identification helps avoid unnecessary repairs. For persistent noise, consult a building or acoustic professional before altering the ceiling. |
Related Posts
-

What Is the Best Acoustic Ceiling Treatment from China?
-
Best Tips for Ceiling Noise Reduction Solutions?
-

What Are the 2026 Top Types of Acoustic Ceiling Panels?
-
Best Acoustic Panels for Ceilings: Enhance Sound Quality & Reduce Noise
-
What is Ceiling Noise Reduction and How Does It Work?
-

Why Choose Acoustic Ceiling Treatment for Your Space?